What Is a Tesla UV Layout? A Visual Guide
Understand Tesla UV layouts with real panel-to-car illustrations. Learn how UV maps work, why artwork gets cut, and how to choose the right wrap template.
A Tesla UV layout is a flat arrangement of the surfaces that receive artwork on your car’s digital 3D model. The model reads different parts of a wrap image and places them on its hood, sides, bumpers and other painted areas. That is why a square PNG can become a design that wraps around a vehicle on screen.
If you opened a Tesla template and found disconnected shapes instead of a car silhouette, you opened the right kind of file. Those shapes are the addresses for your artwork. They are not meant to look like the finished car when viewed flat.
This guide uses actual Model Y and Model 3 template shapes, plus our browser’s native vehicle preview, to explain the connection. The colored panels and sun emblems below are teaching marks, not downloadable finished wraps or photographs of physical vinyl.
One design, two ways of looking at it
Look at the coral hood in the illustration. It appears as one shape in the flat layout and as the front upper panel on the vehicle. The blue regions supply the surrounding bodywork. The gold pieces color the mirror caps. The model decides which image pixels each surface reads; the shapes do not move across the PNG to find the right picture.
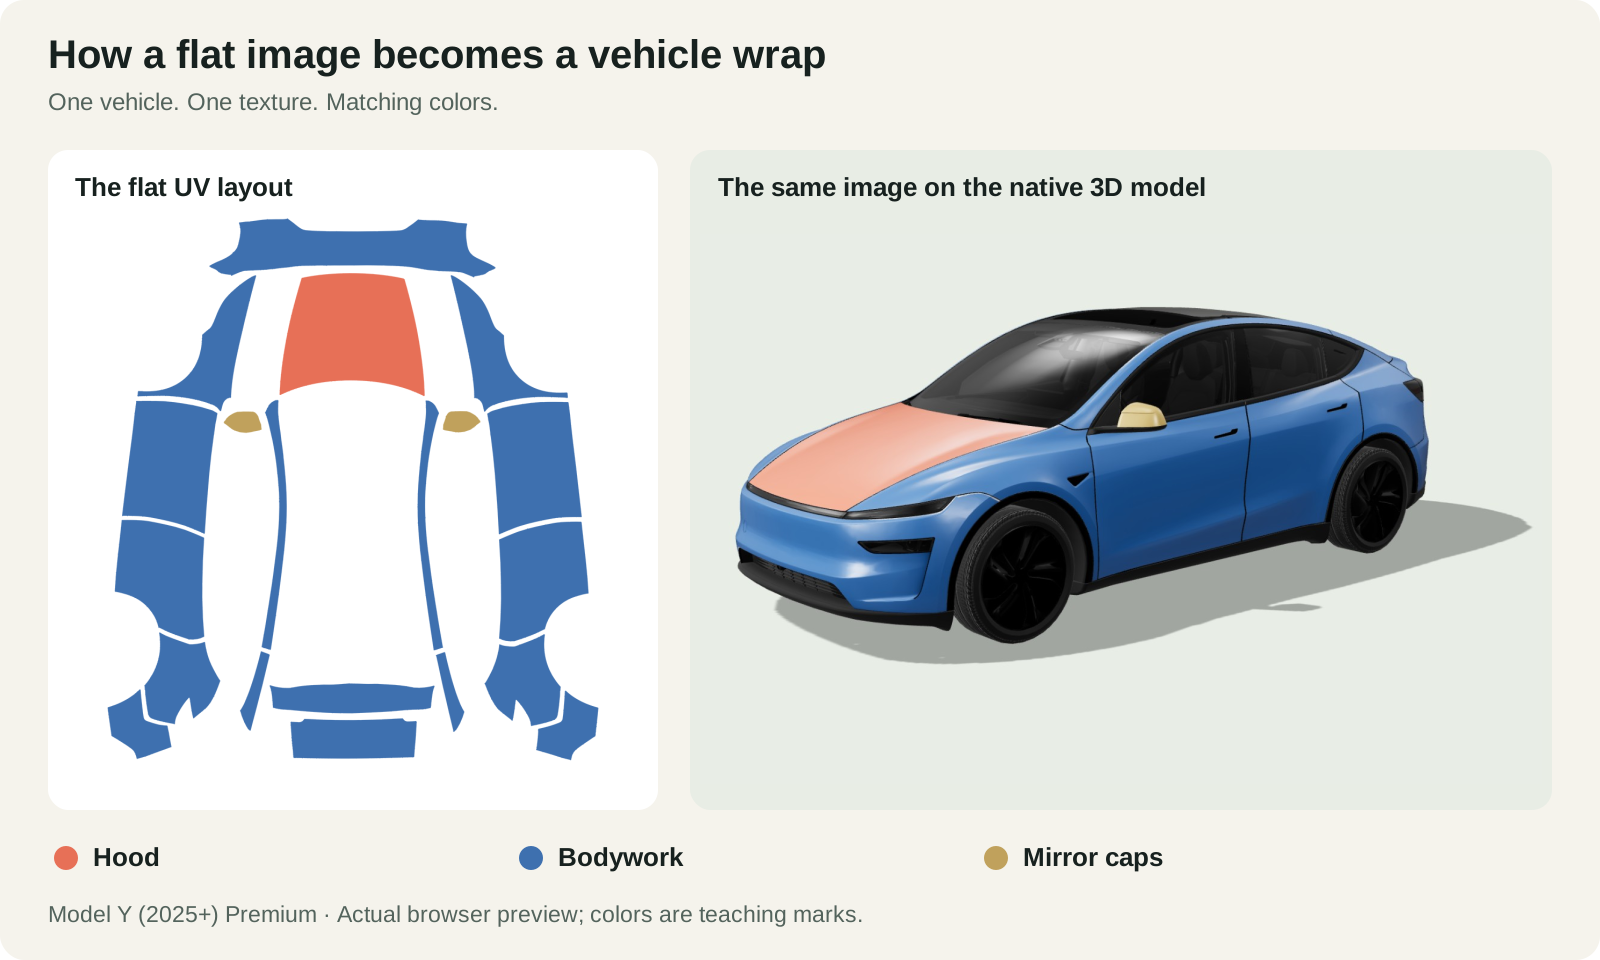
A helpful comparison is a clothing pattern: several flat pieces contribute to one finished object. A UV atlas has an extra complication, though. A piece may be stretched, rotated or packed at a different scale to use the image efficiently. Measuring its width on the PNG does not tell you its width in centimeters on a real car.
The letters U and V name the two texture coordinates, distinguishing them from the X, Y and Z positions used for a 3D object. Here, UV does not mean ultraviolet light or UV-resistant vinyl. For the general graphics concept, see the Blender manual’s introduction to UV coordinates.
UV map, blank template and finished PNG: what is the difference?
These terms are often used interchangeably in searches, but they describe different parts of the job:
- UV map or UV mapping: the model’s correspondence between its 3D surfaces and positions in a 2D image. You normally do not edit this when creating a Tesla digital wrap.
- UV layout or atlas: the arrangement of those surface pieces on the flat sheet. A separate, connected piece is often called a UV island. One visible body area can involve several pieces.
- Blank wrap template: a visible guide to the areas you can design. Tesla’s templates show white paintable regions. The surrounding gaps help you see where the regions end.
- Finished wrap PNG: your colors, pattern, lettering or artwork fitted to the correct template. This is the image you export for Paint Shop, rather than a screenshot of the editor or a shaded 3D preview.
In everyday use, “Tesla UV template” usually means the blank guide, and “Tesla wrap PNG” usually means the finished design. If you only want a ready-made look, start in the digital-wrap gallery. If you want to position your own graphics, the template is the starting point.
How to read the shapes without guessing
Start with a distinctive panel, not with the busiest part of your picture. Temporarily put a bright color or a simple mark in that region and inspect the matching 3D model. Once you know where it appears, check the view from above and from both sides.
Three details matter:
The empty middle is not an extra canvas for a roof portrait. A large blank space between template regions does not become a paintable body panel just because it sits in the middle of the square. In our preview, windows, lights and wheels are separate from the wrap-painted body surfaces. Do not infer a window’s UV location from the apparent outline of the flat template.
The top of the image is not always the front of the car. Different islands can have different orientations. A face that is upright on the PNG may face the wrong way on a panel. Check the hood from above, and check lettering separately on each side.
Neighbors on the sheet are not necessarily neighbors on the car. Two islands can sit very close together in the atlas yet represent different surfaces. Conversely, adjoining sections on the car can be far apart in the image. Draw a stripe to match the vehicle preview, rather than assuming one straight stroke across the sheet will connect correctly.
This is also why a UV layout is not a physical cutting pattern. It provides texture addresses for a digital model, not installation dimensions, stretch allowances or material measurements for a vinyl shop.
Why a face or logo gets cut in half
The model cannot recognize that the two halves of your drawing belong together. If a face overlaps an unused gap, those pixels have no matching painted surface in that part of the layout. If it crosses several islands, the pieces can land on different body areas or turn in different directions.
The example below places the same simple sun emblem at a panel boundary and then entirely within the hood. The template itself does not change.
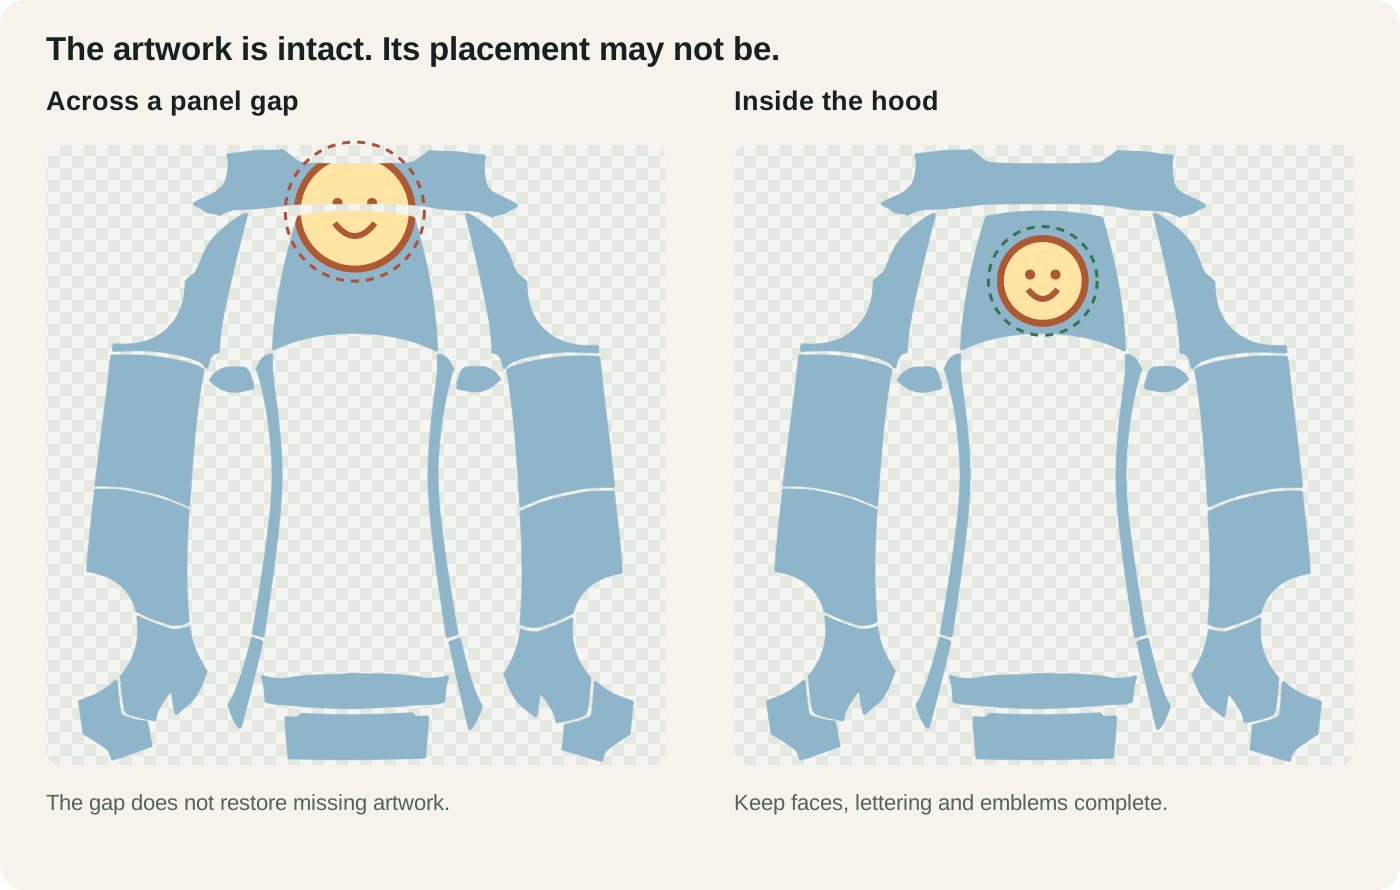
For portraits, keep the whole head, including hair and chin, away from panel edges. For logos, protect the complete outline. For text, leave room around the words and check whether they read correctly from the intended side. A little breathing room is more useful than filling every available pixel with detail.
Place the most important information on the hood or a broad side area, then let background colors and simpler patterns extend across smaller parts. Matching the two sides does not always mean flipping one side horizontally: that would reverse lettering and can reverse an asymmetric emblem. Check each side in its own vehicle view.
AI can help create the artwork, but a prompt alone does not establish the mapping. Even a beautiful generated image still needs to be composed for the correct layout. In our editor, generated artwork is fitted to the selected vehicle’s UV before it reaches the canvas and preview. You can then inspect and adjust it in the Model Y wrap editor.
For character-led designs, our anime Tesla wrap design guide develops this into a full composition brief, including matching side graphics and readable lettering.
Can a Model 3 UV layout work on a Model Y?
Do not assume so. The two examples below are both square images, but their paintable regions occupy different positions and have different shapes. Resizing one square PNG to the same resolution as another does not move its artwork to the correct panels.
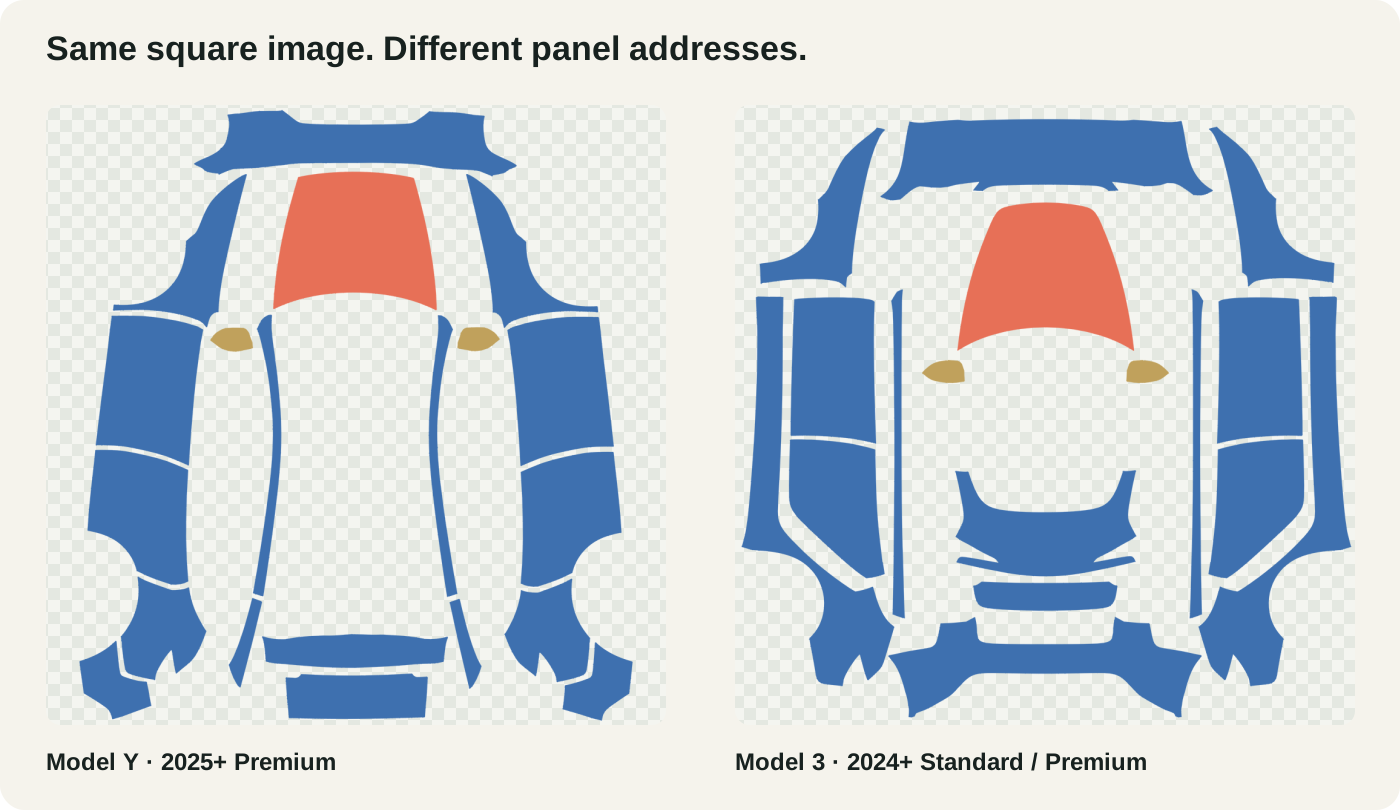
The same caution applies within a model family. A year range, facelift or trim can have its own template. Match all three parts of the vehicle name when they are specified: model, generation or year range, and variant. Our Model 3 and Model Y template guide covers that selection in more detail.
If you want one theme on two different cars, reuse the original artwork or design brief and compose it separately for each template. Reusing the idea is useful; reusing panel coordinates is the part that causes trouble.
What should the exported file contain?
Tesla’s official custom-wrap repository provides model-specific templates and states the image requirements: PNG format, 512 × 512 to 1024 × 1024 pixels, and no more than 1 MB. Check that source for current vehicle availability and import instructions. In our editor, an export follows the selected template’s dimensions and masks the design to its paintable areas.
Before exporting, remove teaching labels, temporary color marks and guide overlays. A checkerboard in an editor usually represents transparency; it should not be flattened into the design as a printed pattern. Keep a copy of your editable project as well as the PNG so you can repair placement later.
If the file looks right but will not import, use the Paint Shop troubleshooting guide. If the design imports but looks misplaced, first recheck the template and panel orientation. Those are different problems, and regenerating the artwork will not automatically solve either one.
A few questions that come up often
Do I need Blender to make a Tesla wrap?
No. Blender is useful for understanding or changing 3D models, but you can create a design with an existing vehicle template and a 2D editor. Our browser editor combines the layout and vehicle preview so you can check placement without learning 3D modeling.
Can I use a normal photo as a UV image?
A photo can be the source artwork. It does not automatically become a correctly arranged vehicle texture. Crop and place the important details on the intended panels, then inspect the mapped result. Uploading a picture and fitting a picture to a UV layout are separate steps.
Why does the flat image look sideways or broken when the car looks right?
The flat image shows the packed pieces, not the assembled result. Some rotation and separation can be expected. Judge the direction and continuity using the matching vehicle preview, while using the flat image to check coverage and panel boundaries.
Will this change my real paint or provide a printable vinyl wrap?
No. This guide concerns the vehicle’s on-screen Paint Shop appearance. A physical wrap needs a separate production and installation workflow.
Want to see the relationship yourself? Open the matching vehicle editor, add one simple mark, and compare the flat layout with the hood and side views. That small experiment makes the meaning of a UV layout much clearer than a whole sheet of unexplained shapes.
Illustration method: colored regions were derived from the matching template and our native-model mapping data. The car image is a render from our actual browser preview. The panel-placement and template-comparison diagrams use the original template shapes; their labels and teaching emblems are our own. These are explanatory digital examples, not in-car validation photos.